Main » 2011 September 3 » How to put the tiles
20:34 How to put the tiles | |
| The process of laying tile requires attention, certain skills and expertise. If you still decide to independently perform this difficult procedure, we will tell you how to put tile on the wall. Surely you've already decided on the choice of tiles, well know in which room it will be laid, then it is necessary to deal with the materials and tools that are needed in the work. And if you're still undecided, I recommend you a good tile store. First of all you will need: tile adhesive, a bucket, where you breed mix, trowel with teeth, the line level, a pencil, Tile, rubber spatula and possibly Bulgarian. The surface on which will be facing, should be flat, it is much easier styling process: align the wall and start laying tile. There are several ways to tile: Diagonal "seam stitch" and "in a bandage." The most difficult way to the called the method of laying tile on the diagonal. In this case it is necessary to conduct cutting tiles in large quantities, but the results are worth it. Tiles, laid in this way, is original and beautiful. Tiling method "seam stitch" involves computation tiles in the usual sequence - one after another, both horizontally and vertically. The method of "dressing in" implies the displacement of each subsequent series in horizontal or vertical direction on half of the tile. In this case, it turns out that the middle of the new tile will be placed over the seam stitches earlier. How do I put the tile without disturbing the course of the next board - need to prepare the ground. To do this, fit a line board that you attach to the wall in terms of horizontal there, where will begin the first row. Note, if you want to put tile on the same level, not only in one room, you need to tie around the perimeter of the board in all areas where tile will be laid. Just be aware that all boards should be on one level, this will lay tile the same way, but not diagonally. If you have a local smooth floors, you can start laying the floor - there are small differences, align them by lining a small bar on the floor of wood chips to equalize. When the preparatory process came to an end, decide where you start packing. It is clear that this will be a corner, but what it is. For this review the possible obstacles that stand in the way, it is desirable to choose the way in which you will need to cut tile, but quite a bit. This brings me to the process, the adhesive mixture knead in small amounts, as tile adhesive can quickly freeze. In order for the angles of the walls were neat and straight, use a tiled bath, put him into a corner, apply glue to the first tile and glue it to the wall. It is also possible to apply the adhesive directly onto the wall. It basically does not matter - everyone is working as it is more convenient. The question how to put tile - decision whether to continue its spread to the next corner on the horizontal. Remember that the tiles must be inserted between the crosses - the joints will still be sealed for a special putty joints. Observe that you have not formed differences between adjacent tiles. In the case of their occurrence, the next tile, place a little more glue and egg-aligned. You are almost finished the first horizontal row is likely that the joint in the corner you will have to cut the tiles. This can be used like an ordinary glass cutter - is ineffective, and a special Tile - allows you to cut the tiles carefully, not chipped corners. Tile in the use of fairly simple. Mark the tile with a pencil cut line, lay the tile in the tool and draw a line from the bottom up, a little pushing on the handle. At the end, giving the tile a little bar - it is cut. If necessary, cut out shapes on the tile under the outlet or switch, you need to be Bulgarian. The incision should be done, leaving a small allowance for tile in a few mm. If necessary, cut a small piece of tile in a couple of inches, use a glass cutter. Move the line to walk her glass cutter and pliers splitting off an extra piece. How do I put the tile, leaving gaps between the flat there? Do not forget to install the crosses, making sure that all the crosses were placed on the same level along the length of the series, otherwise the clutch will look pixelated. Continue the process until the desired stack height of your vertical. Check the evenness of the surface, using level. Attach a long level to the surface and see if there are extra clearance or not. After complete drying of masonry, which is the term day, you can remove the guide strips, tiles as thoroughly entrenched. In addition, you can pull the crosses and start grouting. Normally, professionals use grout for tile that matches the color of the tile, throw it, so that the resulting mass was of medium thickness. Now you will come in handy rubber spatula, which you rub into the joints of uniform grout. When the grout is a little dry, the tiles can be wiped with a damp cloth. In addition, you can use a little trick: using a cable walk on all seams, slightly crushing them. Thus, the grout is equalized, and it will look much more attractive. 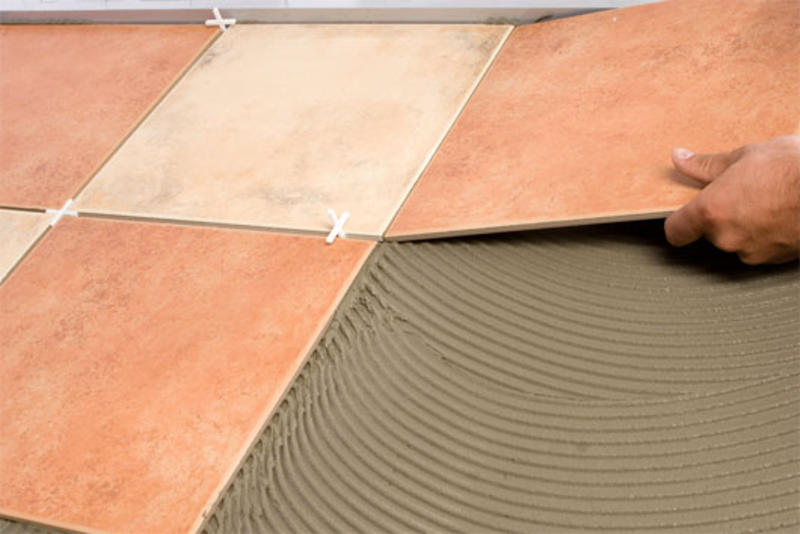 | |
|
| |
| Section categories | ||||||||||||||||||||||||||
|
| Statistics |
Total online: 1 Guests: 1 Users: 0 |
| Login form |
| Search |
| Calendar | ||||||||||||||||||||||||||||||||||||||||||||||||
| ||||||||||||||||||||||||||||||||||||||||||||||||